
Step-by-Step Instructions
- Bake the Cupcakes: Preheat oven to 350°F (175°C). Line a 12-cup muffin tin with paper liners. Prepare the white cake mix according to package directions, substituting milk for water and adding 1 tsp vanilla extract for extra flavor. Divide batter evenly among liners, filling each about two-thirds full. Bake for 18-22 minutes, or until a toothpick inserted into the center comes out clean. Let cool in the pan for 5 minutes, then transfer to a wire rack to cool completely. Cupcakes must be fully cooled before frosting.
- Prepare Buttercream Frosting: In a large mixing bowl with an electric mixer (or stand mixer with paddle attachment), beat softened unsalted butter on medium speed until creamy, about 2 minutes. Gradually add the sifted powdered sugar, 1 cup at a time, mixing on low speed until combined, then increase to medium. Beat in 3 tablespoons of heavy cream (or milk), vanilla extract, and a pinch of salt. If frosting is too thick, add more cream 1 teaspoon at a time until desired consistency is reached. Beat on high for 1-2 minutes until light and fluffy.
- Frost the Cupcakes: Once cupcakes are completely cool, frost each one generously with the buttercream frosting. You can use a piping bag with a round tip for a swirled look or simply spread it with an offset spatula. This will be the “base” for your snow globe.
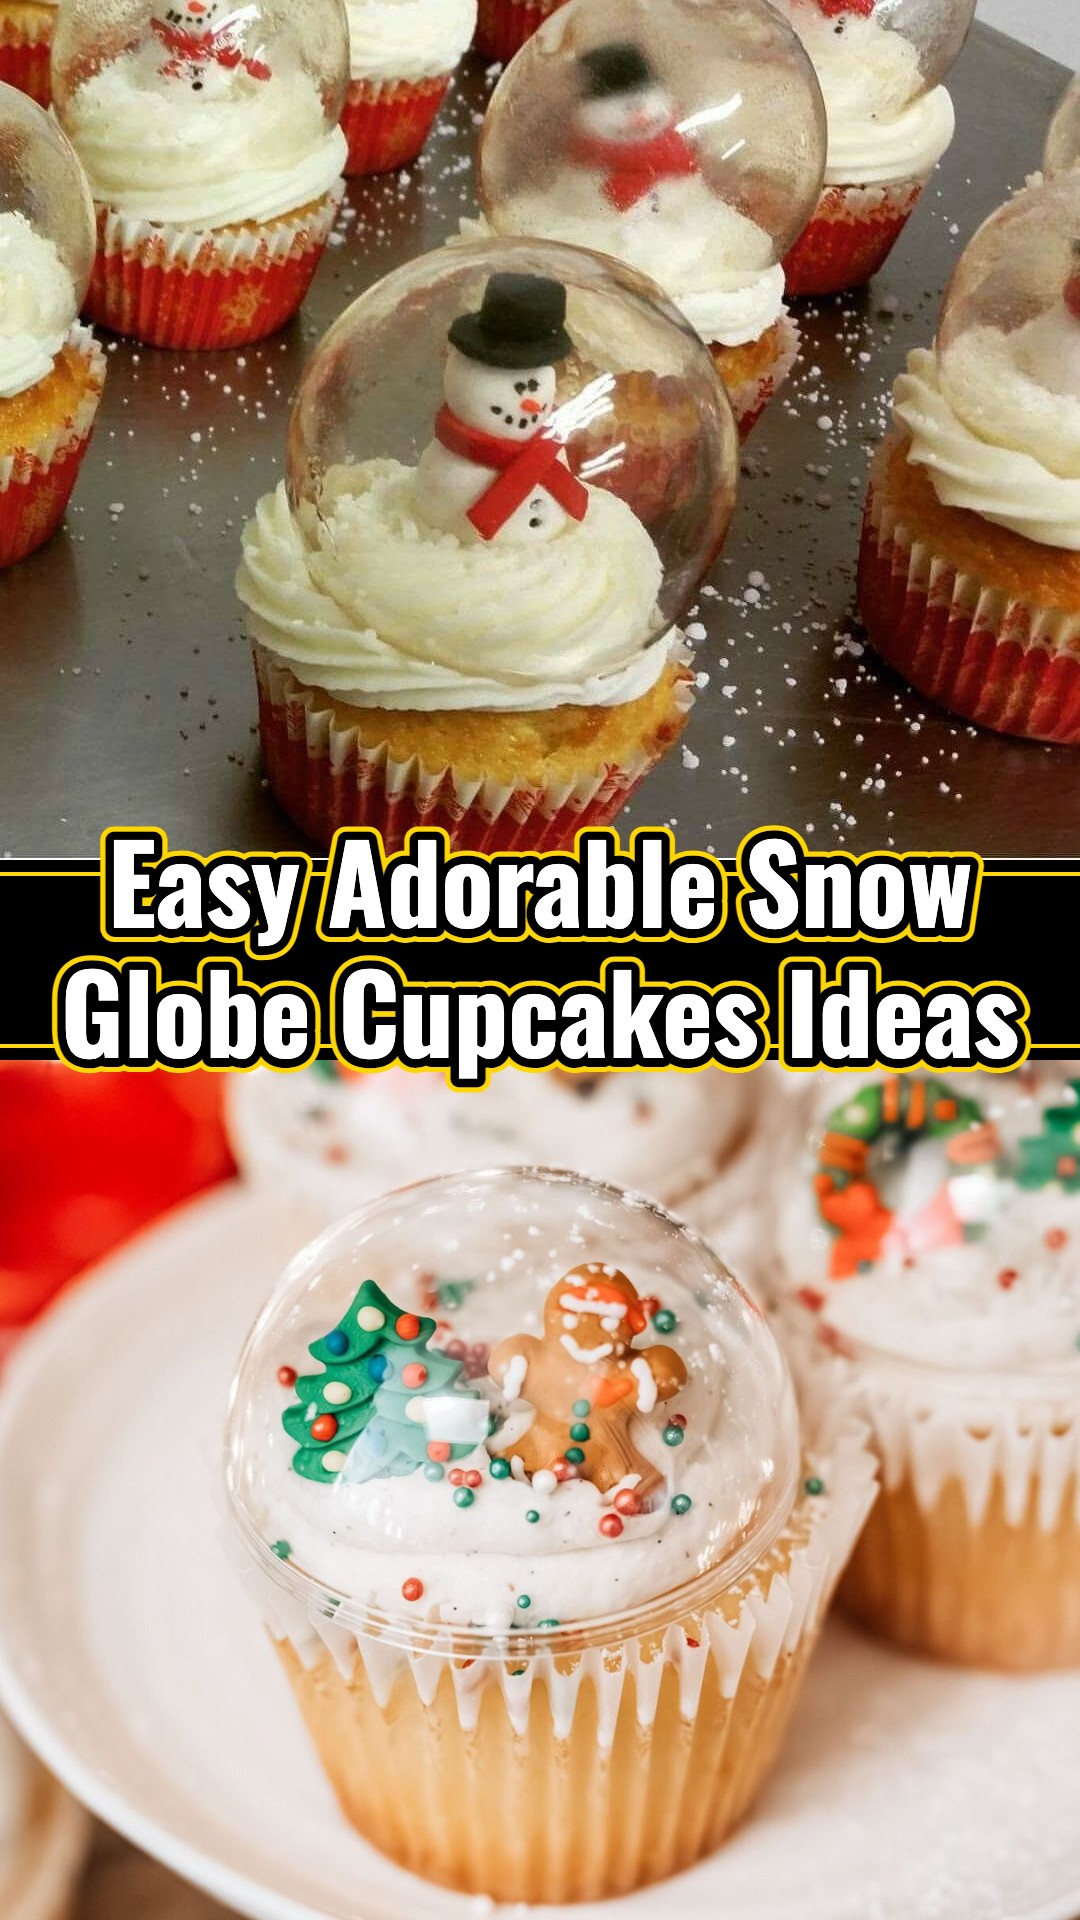
- Create the Snow Globe Scene: Take your clear plastic ornaments. Gently twist them open into two halves. Place a small amount of your chosen edible decorations (e.g., a gumdrop tree, a tiny gingerbread man) inside one half of each ornament. Secure it to the inside bottom of the ornament half with a tiny dot of frosting if needed, ensuring it stands upright. Sprinkle a small amount of edible glitter inside the ornament half around your decoration.
- Assemble “Edible Glass” Domes (Optional but impressive!): In a small saucepan, combine 1/2 cup granulated sugar and 1/4 cup water. Heat over medium-high heat, stirring until sugar dissolves. Bring to a boil and cook without stirring until the mixture reaches 300-310°F (149-154°C) on a candy thermometer (hard crack stage). Be extremely careful, as molten sugar is very hot. Remove from heat. If desired, carefully stir in 1-2 drops of blue food coloring. Immediately and carefully pour a small amount of the hot sugar mixture into the other, empty half of each plastic ornament to create a thin, edible ‘glass’ dome. Tilt the ornament half to coat the inside evenly. Let cool completely and harden (about 10-15 minutes). Once hardened, carefully peel the plastic ornament half away, leaving a clear sugar dome. Alternatively, you can skip this step and use the plastic ornament halves directly for the globe.
- Final Assembly: Gently press the prepared “edible glass” dome (or the plastic ornament half with your scene) into the center of each frosted cupcake. Arrange the ornament so the scene inside is clearly visible. Sprinkle desiccated coconut or white nonpareil sprinkles around the base of the “snow globe” on the frosting to create a snowy effect. Finish with a final dusting of edible glitter for extra sparkle!
Full Ingredients
- 1 box (15.25 oz) white cake mix
- 1 cup whole milk (or water, as directed on cake mix box)
- 1/2 cup vegetable oil (as directed on cake mix box)
- 3 large eggs (as directed on cake mix box)
- 1 tsp pure vanilla extract (for enhanced flavor)
- 1 cup (2 sticks) unsalted butter, softened
- 4 cups powdered sugar, sifted
- 3-4 tablespoons heavy cream or milk
- 1 teaspoon pure vanilla extract
- Pinch of salt
- 1/2 cup granulated sugar
- 1/4 cup water
- 1-2 drops blue food coloring (optional, for a slightly icy tint)
- 12 small, clear, food-safe plastic ornaments
- Assorted small edible decorations (e.g., gumdrop trees, mini candy canes, tiny gingerbread cookies, sprinkles, small fondant cutouts)
- Edible glitter (white or silver)
- 1/2 cup desiccated coconut or white nonpareil sprinkles (for “snow” on cupcakes)
Shopping List
Dairy & Eggs
- 1 cup (2 sticks) unsalted butter
- 3 large eggs
- 3-4 tablespoons heavy cream or milk
- 1 cup whole milk
Pantry & Baking Aisle
- 1 box (15.25 oz) white cake mix
- 1/2 cup vegetable oil
- 4 cups powdered sugar, sifted
- 1/2 cup granulated sugar
- 1 teaspoon pure vanilla extract
- Blue food coloring (optional)
- Edible glitter (white or silver)
- Assorted small edible decorations (gumdrop trees, mini candy canes, tiny gingerbread cookies, sprinkles, fondant)
- 1/2 cup desiccated coconut or white nonpareil sprinkles
Specialty/Craft (Food-Safe)
- 12 small, clear, food-safe plastic ornaments
Equipment Needed
- Standard 12-cup muffin tin
- Paper cupcake liners
- Large mixing bowls
- Electric hand mixer or stand mixer
- Rubber spatula
- Wire cooling rack
- Piping bag (optional, for frosting)
- Small saucepan
- Candy thermometer (optional, but recommended for edible glass)
- Small, clear, food-safe plastic ornaments (flat bottom recommended, approx. 2.5-3 inches in diameter)
- Small cookie cutters (for optional fondant elements)
Variations & Serving Ideas
These enchanting Snow Globe Cupcakes are more than just dessert; they’re tiny conversation starters, perfect for brightening up any holiday gathering, from a cozy family dinner to the annual town potluck. Imagine them adorning your grandmother’s antique cake stand or arranged artfully on a festive platter – they truly bring a touch of small-town wonder to the table. They’re absolutely ideal for Christmas parties, a delightful surprise for school events, or even as a special, magical treat to leave out for Santa Claus. When it’s time to enjoy, take a moment to admire the delicate winter scene before diving into the delicious cake and frosting! Should you miraculously have any leftovers (we doubt it!), store them gently in an airtight container at room temperature for up to 2-3 days. For extended freshness or in warmer climates, refrigeration is fine, but always allow them to come back to room temperature before serving to ensure the buttercream is perfectly soft and creamy.
And there you have it, dear friends – your very own magical, edible Snow Globe Cupcakes! I hope this recipe fills your kitchen with the sweet scent of holiday cheer and brings a twinkle to your eye as you craft these festive masterpieces. There’s something truly special about making something beautiful and delicious with your own hands, especially when it brings joy to those around you. We’d absolutely love to see the charming scenes you create in your own small town kitchens! Please share your photos and tell us about your favorite snow globe ideas in the comments below. Happy baking and wishing you the happiest of holidays from our kitchen to yours! #ChristmasBaking2025 #EdibleGlass #HolidayHacks #SnowGlobeCupcakes #PinterestMom #ChristmasPartyIdeas
